For Use in Active Directory Projects and Learning How to Manage a Domain Controller
Skills Developed in This Project
- Installation of Windows Server 2019 in a virtual machine
- Installation of Windows Active Directory
- Configuration of a Domain Controller
- Configuration of an Active Directory Domain Controller to provide internet access to clients by using a NAT interface and an internal network interface.
- Creation and configuration of a DHCP server to provide IP addresses to clients on the Domain Controller’s internal network and configuring clients to use the Domain Controller for DNS.
- Learning how to use important features of Active Directory such as Organizational Units (OU’s), Admin and user account creation in Active Directory Users and Computers, and install features with Add Roles and Features.
- Connecting to the Domain Controller from a Windows 11 Enterprise client on the internal network, and confirming proper network configuration with the Command Prompt.
Overview of the Project
The primary purpose of this project is to learn the basics of how an Active Directory Domain Controller can be set up for use in further projects. It is a useful starting point for learning Active Directory and getting oriented within it. Following this project will be more Active Directory projects which have more direct applications to IT help desk or IT support roles.
This practice environment is primarily based on a tutorial guide by Josh Madakor, but differs from it significantly, and also elaborates further on steps which were not covered in enough depth. By completing the practice environment setup myself, and reading comments left on the original video, I can see that readers are likely to have problems by going off of the video alone. It seems that certain steps were skipped over in the video because he had made configuration changes before starting the recording and forgot to mention them.
If you want to follow along you can just copy my work when it comes to IP addresses, but you should really learn the basics of IPv4 if you don’t understand what’s going on in the DHCP section. At the very least learn about private vs public addresses, subnet masks, CIDR notation, Network Address Translation (NAT), and DHCP leasing. Also you should understand what an APIPA address and a default gateway are. If you don’t know what any of those are then you won’t really be able to do basic troubleshooting other than making sure you copied my work. My tutorial also assumes you have some basic understanding of how to use a type 2 hypervisor (virtual machine software), in this case Oracle VirtualBox.
For this practice environment I used VirtualBox with a Windows Server 2019 Desktop Experience VM (Virtual Machine) for the Domain Controller and Windows 11 Enterprise Eval VM for the client. The client VM won’t be made until after the Domain Controller is complete, because we will use the Domain Controller for its internet connection.
The reason I am using Windows Server 2019 is primarily because I found the most in depth guide for Active Directory was using server 2019, but also because it will continue to get security and reliability updates until 2029. It is very common for businesses to put off upgrading to newer server OS’s until it is absolutely necessary. It doesn’t greatly change the applicability of the lab because it’s still using a newer version of active directory.
We will cover the network settings of the virtual machines in Virtual Box; however, the basics of setting up a VM will not be covered.
Windows Server VM Setup
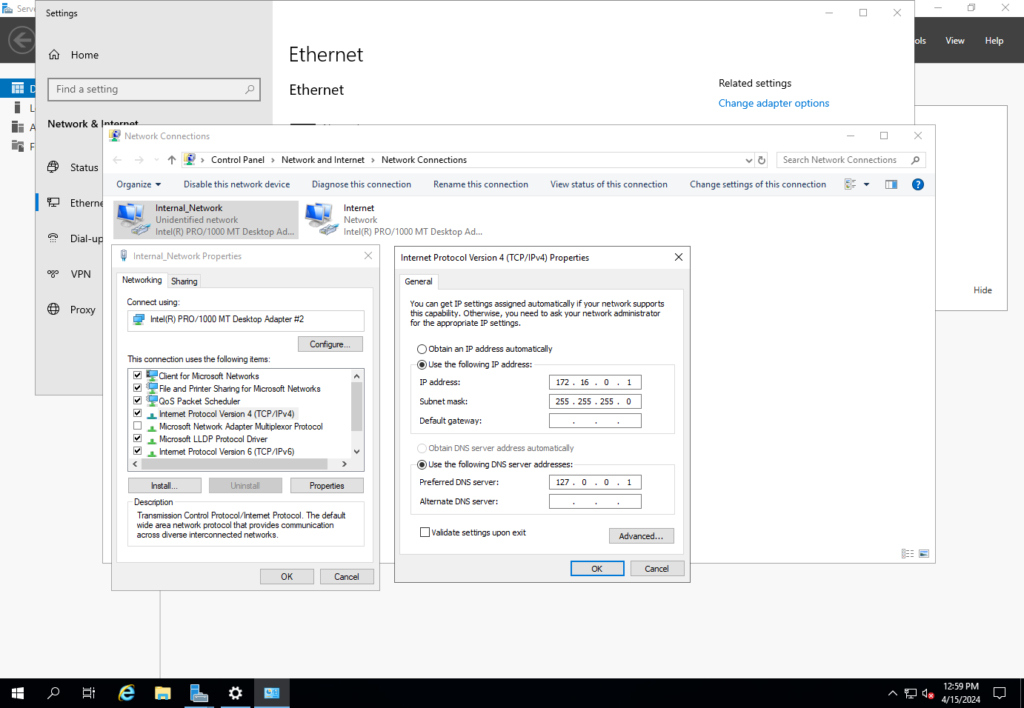
Make sure you get the Desktop Experience edition of Windows server. Desktop Experience has a GUI while the Server Core is command line. I configured the Windows Server VM to have one NAT network interface and one internal network interface. After installing the Server ISO I renamed the corresponding NIC’s in the network settings and set up the internal network. It is easy to identify the internal network because it has an APIPA address (an IP starting with 169.254 ). An APIPA address indicates that it has not received a DHCP assigned IP address because it is not connected to a DHCP server. Once identifying the internal network NIC in the server’s network settings, I changed it’s IPv4 address to a private IP address, 172.16.0.1, and gave it a DNS address.
Installing and Configuring Active Directory Domain Services on the Windows Server
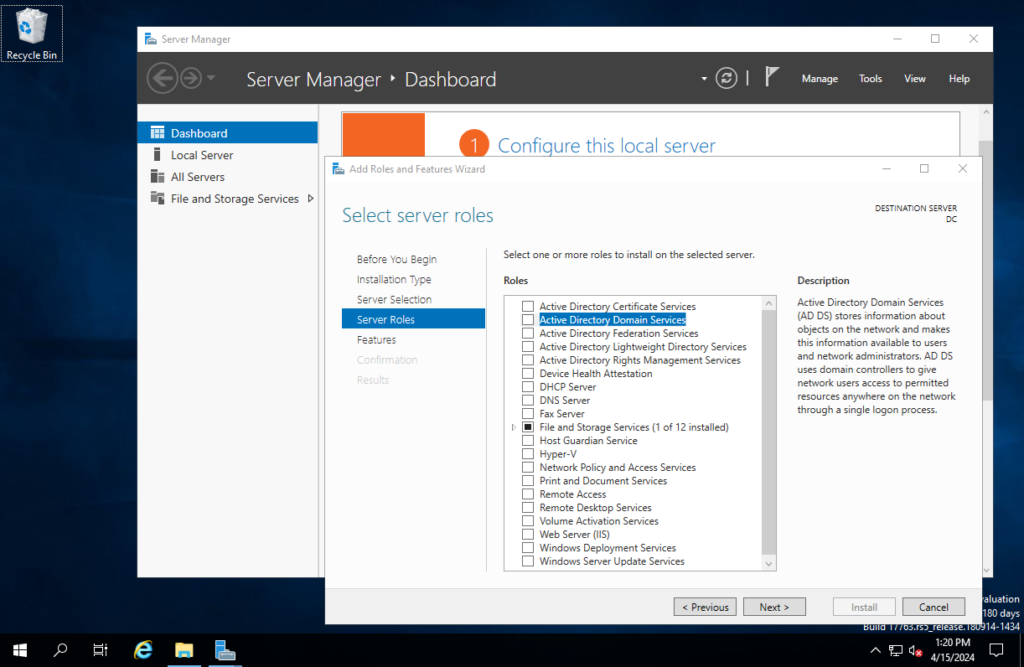
To install Active Directory Domain Services (AD DS), open up the Server Manager dashboard, select Add Roles and Features > Server Roles > Active Directory Domain Services, then complete the installation of Active Directory Domain Services.
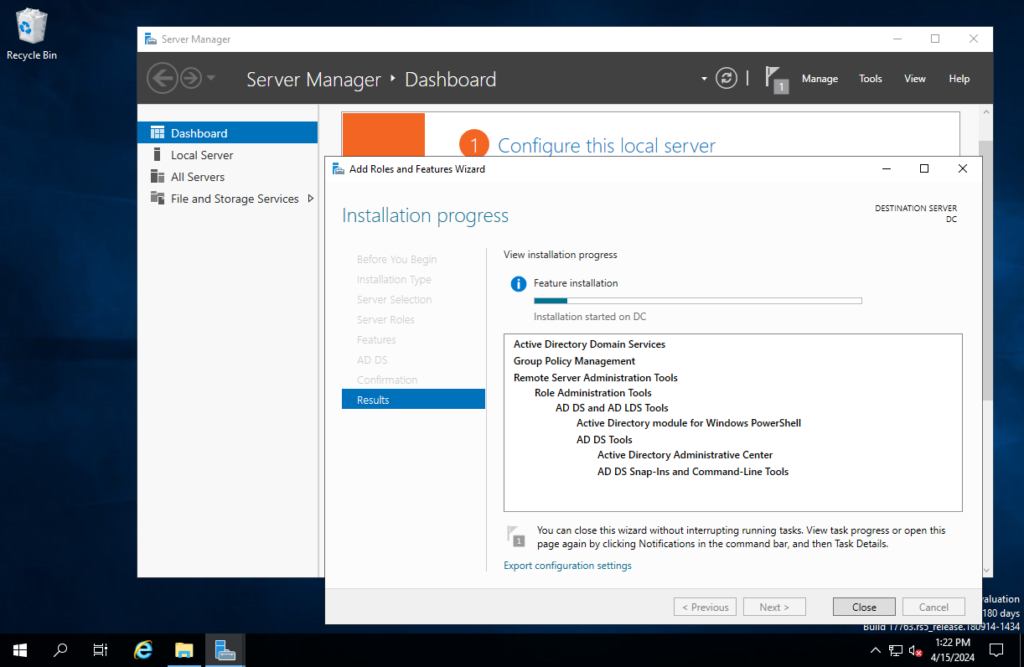
This installation only installs the software for AD DS, but there isn’t a domain created yet. To create a domain, click on the flag icon in the Server Manager toolbar. It has a notification to remind you to do a Post-deployment Configuration with an option to Promote This Server to a Domain Controller.

In the Deployment Configuration window, select Add a new forest and enter the Root domain name. This domain name is a literal domain name like that of a website; however, this isn’t a domain on the public internet, so it doesn’t have to be unique. For this I just used “mydomain.com”. On the next page, enter the password you want to use for Directory Services Restore Mode (DSRM). Leave everything else default and install it.

After the install is complete, the server will reboot itself. Upon seeing the login screen you will notice that is now says “MYDOMAIN/Administrator” whereas before this install it just said “Administrator”.
Overview of Orgainizational Units (OU’s)
OU’s are a type of special container in Active Directory which contain objects. Objects can be users, groups, computer accounts, and other containers. To give a simple analogy, OU’s are basically acting the way that a file folder would act in a file system.
Another important aspect of OU’s is that they allow the domain admin to delegate permissions so that only certain users or groups can access the OU. They also allow the admin to assign Group Policy Objects (GPO’s) to users and computers inside of an OU. This means that you don’t have to individually assign a rule to each user but instead can make overarching rules for the whole OU.
Creating an OU and a Dedicated Domain Admin Account
The next step is to create a dedicated domain admin account. Start by:
Clicking onStart Menu > Windows Administrative Tools > Active Directory Users and Computers.
The first thing I did is create an OU (Organizational Unit) to put the Domain Admin account into. This can be done by:
Right-clicking “mydomain.com” (or whatever your domain name is) > New > Organizational Unit. Then enter the name of the OU. I named it _ADMINS.


Now that we have an OU for our domain admin accounts, we can create a new user in the _ADMINS OU. This can be done by:
Right-clicking _ADMINS > New > User.
Then enter the name and login username for the user. Many organizations use a first initial followed by the full last name with no spaces. For an admin account it starts with a-. After that you enter the password for the user and select or unselect the options beneath it regarding password policy. For a practice environment it is much more convenient to leave everything unselected other than Password never expires. Obviously in a practice environment you can afford to have less than ideal security practices as long as you are aware of how a production environment would differ.


What this has done is create a new account inside a OU called _ADMINS, but it has not actually created an admin account. To make this account an admin account:
Right-click the user > Properties > Member Of tab > Add > in the box labeled Enter the object names to select, type “domain admins” > Check Names to see if it resolves that name > OK > Apply > OK.


To Log in as this new admin account, you need to log out. When getting to the login screen, select Other user instead of the original MYDOMAIN/Administrator account.
Configuring the Internal Network to Receive an Internet Connection From the Domain Controller
RAS / NAT
In the Server Manager Dashboard click Add roles and features > Server Roles > Remote Access > Next until you get to the Role Services section > Select both DirectAccess and VPN (RAS) and Routing (click Add Features in pop-ups) > Next until you reach the Install option.


Now the Routing and Remote Access must be configured:
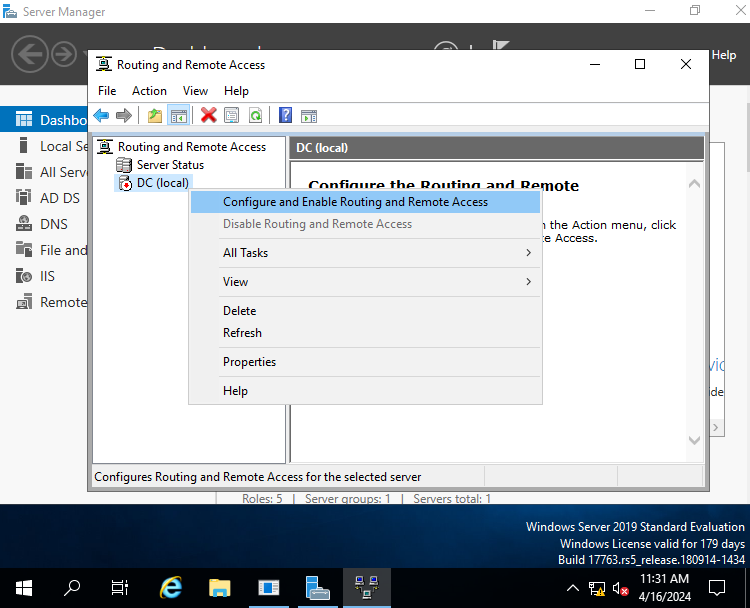
In the Server Manager Dashboard click Tools > Routing and Remote Access
Inside the Routing and Remote Access window:
Right-click the domain (DC local), and select Configure and Enable Routing and Remote Access. This opens options for configuration. For this practice environment it will be set to NAT (Network Address Translation) which will allow all internal clients to share one public IP address. NAT is what allows any routing device to have many devices with private IP addresses while only having one public IP addresses.

After selecting NAT configuration, you need to select an interface to use as the internet facing interface. Renaming the interfaces in the beginning of the project makes this part easy, as you just have to select the one named “Internet”, or whatever you named it to indicate that it is not the internal network’s interface.

DHCP and DNS
Although the internal network clients are now able to access the internet through NAT, they still need to receive a DHCP address. For this, we will configure a DHCP server in the Domain Controller. This will automatically assign IPv4 addresses to all clients that are on the internal network.
To set up the DHCP server, start by going back to the Server Manager Dashboard and clicking:
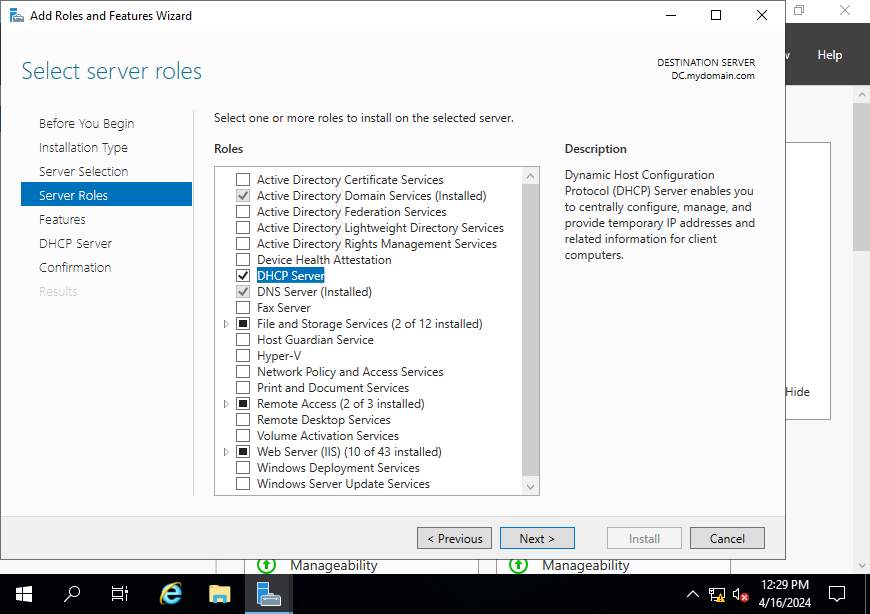
Add roles and features > Under Server Selection confirm the proper server is selected. Now it should be “DC.mydomain.com” > Under Server Roles select DHCP Server > Add Features > Click Next until you have the option to click Install and start the installation.

Now the DHCP server needs to be configured to have the proper scope.
In the Server Manager Dashboard top toolbar select Tools and DHCP.
Once opened, click the drop-down arrow for the domain, and right-click on IPv4, then click on New Scope.


The scope needs to be named. This is especially useful on larger networks which may have many different subnets. In this case, without any particular naming convention, I am just naming it by the IP address range that it is for. Name: 172.16.0.100-200 with no description.
Then when entering the IP address range, the starting IP address is 172.16.0.100, and the end IP address is 172.16.0.200. The subnet mask is 255.255.255.0, which would be a /24 in CIDR notation. This means the subnet mask is using 24 bits with only the last 4 bits being used as network bits on the subnet. That is why you can either manually type in 255.255.255.0 or just set the length to 24.
There is no need to exclude any IP addresses on this subnet, so the next window will be skipped.
The Lease Duration is how long a client on the subnet will keep their assigned IP address before it is eligible to be reassigned to another client. This is very dependent on the use case for the subnet. If it is being used for a business that has many customers coming in to use the WiFi for a few hours, then there is no need to have that IP tied up for 8 days. 8 days is the default, which I will leave as is. In a practice environment there is no need to worry about an IP address being tied up to a device that no longer needs it.


Now the DHCP options can be configured. This includes the Router, also called the default gateway, and the DNS which will be used by the clients. The IP Address of the default gateway for this subnet is the IP Address of the internal network interface, 172.16.0.1. Make sure this is the IP address of your internal network interface, and not the internet interface.

For DNS, we are going to use the domain controller because Active Directory can provide DNS. To do this enter the domain name, mydomain.com, into the Parent domain box. It should already be auto-filled in there by default. After this, click Next until you can click Finish.
Before closing the DHCP window, right-click the dc.mydomain.com DHCP server and select Authorize, then right-click again and select refresh.


Adding Users with a PowerShell Script
This section describes how I added users to Active Directory using a PowerShell script written by Josh Madakor, which contains 1000 random names so that the practice environment can more closely replicate a production environment full of users.
Start by downloading AD_PS-master from joshmadakor1’s github. https://github.com/joshmadakor1/AD_PS
I chose to download it onto my host computer and transfer it to the Domain Controller VM instead of enabling web browsing on the Server. Using a web browser on a server is not a good security practice, which is why there are warnings that come up if you try to use the browser. It isn’t a real concern in this practice environment context, but it’s worth taking note of.
After extracting the .zip folder into the server’s Desktop folder, open PowerShell ISE as Administrator:
Start Menu > Windows PowerShell Drop-down > Right-click Windows PowerShell ISE > Hover mouse over More > click Run as Administrator
Inside PowerShell, click Open (Folder icon in toolbar), navigate to the AD_PS-master folder and open the 1_CREATE_USERS script inside it.

Although the script is available for PowerShell to run, there are security measures in place to prevent the execution of unsigned scripts. You certainly would not just disable this execution policy in a production environment; however, in the context of a practice environment, there isn’t anything really at risk if an attacker is able to execute an unsigned script in a virtual machine with no sensitive information on it.
The >Set-ExecutionPolicy command allows you to change the restrictions on what scripts are allowed to run.
>Set-ExecutionPolicy Unrestricted will disable this important security feature so we can artificially populate Active Directory with users. Due to the security concerns, it will require you to confirm with a warning message. Select Yes to all.

The script will create users based off of a .txt file full of random names. You can add names to the list if you like and it will make user accounts for those names. It automatically creates a username by taking the first letter of the first name followed by the full last name.
To run this script, navigate to the AD_PS-master directory inside the PowerShell command line.
Run this command with your admin account name: cd C:\Users\a-jsanders\Desktop\AD_PS-master
You can then run the >ls command to confirm that you are in the correct directory and that the “names.txt” file is inside the directory. It doesn’t hurt to check, in case you accidentally moved it while adding names.
Finally, you can run the script by clicking the Play button in the top toolbar. You can also just type in the command to run the script. In general, the command to run a downloaded script is just the script’s file path typed out. If you have it saved in a different directory than I have, then the command would look different.
>C:\Users\a-jsanders\Desktop\AD_PS-master\1_CREATE_USERS.ps1
To confirm that it worked, open up Active Directory Users and Computers, which you can open from the Start Menu under Windows Administrative Tools. Then open the “_USERS” OU by clicking on “mydomain.com” and selecting it from the drop-down menu.
Windows 11 Enterprise Client VM Setup
This is a normal VirtualBox ISO install using a free evaluation version of Windows 11 Enterprise which you can download from Microsoft’s website. The only thing special about the VM setup is that the network needs to be set to “Internal Network”. If you leave it set to NAT, then it will just use your host OS’s NIC directly instead of being routed through the Domain Controller. Before starting the VM, go to the VM’s settings, under Network, and change Attached to: from NAT to Internal Network.
If you, like me, are taking screenshots in the VM and want to easily transfer them with drag and drop onto your host, then make sure to enable drag ‘n’ drop in the VM settings under General in the Advanced tab. This feature will also require VirtualBox Guest Additions are installed on the VM. That is done by clicking Devices in the VM toolbar and selecting Insert Guest Additions CD image. Once it shows up in the VM’s file explorer, find the Windows amd-64 version in it and install it.
After the Windows ISO is installed in the VM, you will be asked to sign in to a Microsoft account during setup. You do not need to do this if you are attached to the internal network. It has an option to connect to domain, found underneath the Microsoft account sign in.
Alternatively you can just shut off the server VM so that the client has no internet connection and tell it I don’t have Internet then select limited install when it recommends getting internet. If you do it this way you will never even be prompted to sign in to a Microsoft account. Once you turn the server VM back on you will automatically receive internet, but it may take a minute to connect. There isn’t really any reason to do it this way but I just wanted to add it in case you had the server off when trying to set up the Windows 11 client VM. All it needs to connect to the server is to be set to use the Internal network in the VM settings.
Both of those methods result in you creating a local account on the client, but you aren’t actually logged in to an account from the domain’s “_USERS” OU.
To confirm you are connected to the Domain Controller’s internal network, are receiving an IPv4 address from the Domain Controller’s DHCP server, and it’s DNS, run the >ipconfig command in the command prompt on the client. Notice how I have an IPv4 address that is within the DHCP scope we defined earlier. It also shows “mydomain.com” as the DNS, and it shows that I have the correct default gateway.

If no default gateway is showing in the >ipconfig results, then maybe you missed the step of adding Router under DHCP Server Options when configuring the DHCP server in the DC. Check to see if you put the IP address in there. When that is confirmed, go back to the client and run the command >ipconfig /renew to get that default gateway set on the client.
Now to confirm the DNS server is working, and to see if you have internet connection, run the ping command with a FQDN (Fully Qualified Domain Name) to see if the DNS server will resolve it for you. If you have 0 lost packets then it’s a success.

We have internet connection from the domain, but we aren’t actually logged into the domain on a user account. To log into a domain user account, we need to change more settings in the client. Before we do that let’s go over how you can make a new user account in the domain. The following projects will cover this in more depth and will also use a different method.
To create a user account in the domain, open up the Active Directory Users and Computers window as we did in the previous part of the lab. Then click on “_USERS” and click the “Create new user in the current container” button. Then just make yourself an account. This is the account you will use to get your Windows client VM setup.
Signing in to a User Account on the Domain from the Client
This requires that we join the domain on the client. During the process we can also rename the client so it’s easier to identify the device when looking at Active Directory. This is very important if you start adding multiple client VM’s to the domain later.
First, on the client VM, go to Start Menu > Settings > System > About > and click Domain or workgroup in the Related Links section below the device specs.
If you just click Rename this PC, then you won’t be able to join the domain from there.

Next click on Change and enter the client computer’s new name. It should be something like CLIENT1.
After typing in the name, select Domain just below that, and enter the name of the domain. In this case it is “mydomain.com”. After you click OK, you will be prompted to enter credentials for a user account on the domain. It can be a normal user account or an admin account. After a few seconds it should say “Welcome to the mydomain.com domain”. You will then need to restart for changes to take effect.


When you go to log in after the reboot, and you click Other user, you should see that it says “Sign in to: MYDOMAIN” underneath where you enter the username and password. You can log in to this Windows client with any one of the accounts on the domain. It will take an extra minute to load compared to when you were logging in with the local account before. After the first time you log in with the domain account it will load more quickly.
Now that the client is on the domain, you should be able to see it in the Domain Controller. It will show that CLIENT1 is connected, even when the client is on but no user has logged in. With that completed, you can simply repeat these steps again to make multiple clients for your domain. The Windows 11 Enterprise Eval ISO can be reused to make multiple clients at the same time, and is not limited to a single install. That concludes this guide for setting up an Active Directory practice environment. Next you should look at my other posts on Active Directory to learn more about how to use it.
Thank you for reading!

0 Comments