A Series of Posts Exploring the Features of Active Directory and Simulating Common IT Support Scenarios
Skills Developed in This Project Series
Part 1
- How to use important Active Directory tools and features such as: Find, View Advanced Features, Object Properties, and Attribute Editor.
- Creation/deletion, enabling/disabling, and setting expiration dates for User Accounts.
- How and when to use common Command Prompt commands such as
ipconfig,net use,net user, andping. - Connecting computers to the domain.
- Using Active Directory from client computers on the domain.
- Creation of Organizational Units (OU).
Part 2
- Remotely unlocking a user account after repeated failed login attempts, and helping a user reset their password.
- Using Group Policy Editor to set security and password policies for the domain.
- Using the Command Prompt to view information about another domain user’s account.
- Enabling/disabling a computer account on the domain, and how to add the same computer account back to Active Directory after deletion.
- Creation of share folders on the domain controller and mapping those shares to users’ computers.
- Creating Security Groups, editing permissions, and disabling inheritance.
- Configuring the automatic creation of folders for individual users within a share drive.
Part 3
- How to enable and use Remote Desktop, Windows Remote Assistance, Remote Administration Tools such as Remote Registry, and remotely accessing a computers file system.
- Using Group Policy Management to remotely disable services on a computer or user account through Computer Configuration or User Configuration options.
- Using important Group Policy commands such as
gpupdate /forceandgpresult /r. - Using Group Policy Wizard to generate reports.
Part 4
- Installing and using PDQ Deploy Enterprise to silently install and uninstall software on computers remotely without disrupting the user.
- Installing and using PDQ Inventory Enterprise synced with Active Directory to run reports and remotely manage computes on the domain.
- Creating a print server, installing/updating print drivers, configuring sharing settings for a printer, client-side vs server-side rendering, and accessing the printer as a user.
- Understanding the importance of Delegation of Control, and how to use the Delegation of Control Wizard to assign common task permissions as well as create custom tasks to delegate.
PDQ Deploy Enterprise and PDQ Inventory Enterprise
Silently Installing Software on a Client Computer While It’s Being Used
In the previous post covering Remote Desktop use, I mentioned how one of the main disadvantages of using Remote Desktop or screen sharing in a production environment is disrupting the user. If we can accomplish something without disrupting the user, then we should use the least disruptive option. One example of this is software installation.
Installing PDQ Deploy Enterprise Free Trial
To practice this, we will use PDQ. You can get a 2 week free trial. The specific download is PDQ Deploy Installer from https://portal.pdq.com/billing/download. If you have Virtual Box Guest Additions downloaded on your server VM, then you can just download the .exe on your host OS and drag and drop it into the server VM. Personally I have had drag and drop not work despite being on before starting the VM, which can be fixed by restarting the VM. As a side note, if you don’t like giving out your email address for free trials, then check out Simple Login (not sponsored), which allows you to make multiple emails for throw away purposes like this.
This is an Enterprise version trial of PDQ Deploy, but you don’t have to give any payment information, so there is no chance of you getting billed when the trial expires. You don’t have to enter your phone number despite them having an entry field for it.
We will use PDQ Inventory later, so download it too while you are on this page. Don’t forget to copy the License Keys for each if you intend to close the browser tab before installing them on your VM.
Confirm that your Server VM has access to the internet. Use the ping command to see if you can reach 8.8.8.8, which is Google. If you have internet connection, then you can launch the PDQ Deploy installer .exe. If you don’t have internet, then check back to the first Active Directory project to confirm you configured your IPv4 settings and Virtual Box adapter settings correctly. This is something you really need to be able to troubleshoot because it is essential for almost any IT project that requires internet connection.

Keep in mind that this part will look a bit different depending on when you are doing this project. For example, tutorials I have seen on PDQ from just a few years ago did not require entering a product key for the trial version. At this time in 2024, a product key is required and should be available on the page you got the installer download from. With shared clipboard enabled in the VM settings, you can easily copy and paste the license from the host, and the email you used from your host’s password manager.
Speaking of password managers, we can actually install one of my favorite FOSS (Free and Open Source Software) password managers using PDQ Deploy. BitWarden is a really great free password manager, with paid options offering more features. I’m also a fan of Keypass, but for this project we will go with BitWarden. Honestly I am only picking it because I happened to see it right towards the top of the list of software in the Package Library, but as a bonus it will make you aware of a great password manager.
Using PDQ to Install Software on Domain Computers
To install software on domain computers, you first need to locate it in Package Library. Click on the package you want to download, in this example it is BitWarden. When clicking on it and highlighting it, you will notice that you have the option to download different versions on the right side of the screen. This is useful if your organization is using a version of the software that is not the newest release. Deploying the newest version of any software can potentially cause problems in a production environment, and often needs to be tested before deployment. Sometimes it’s a technical issue and sometimes it’s just that employees would need to be trained on the new version, which could be costly if unnecessary.
In this case, I’m going to download the latest version of BitWarden by clicking the download button next to the newest version number.
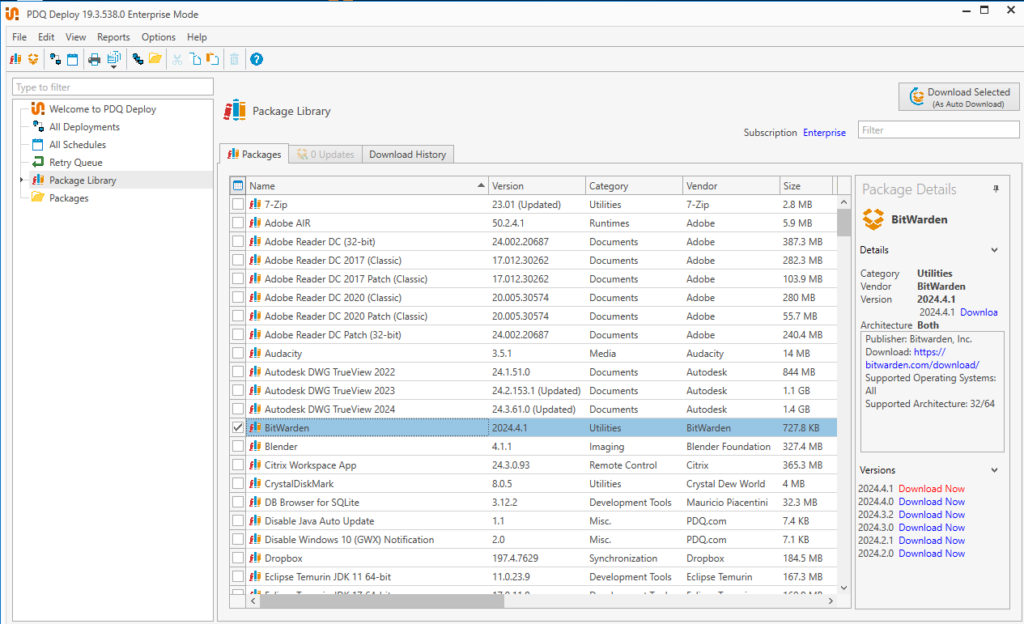
You should see the new package in your Packages, just underneath Package Library. Right-click on the package to see the options. Click on Deploy Once. From here, we can select which computer we want to deploy BitWarden to. Click Choose Targets, then hover over Active Directory and click on Computers. You can also deploy by containers if you want.


From here we can select which computers we want to deploy the software to. Don’t be confused by the term “Deploy Once”, as it doesn’t mean only deploy to one computer. We can deploy to all of our client computers here at once by selecting all of them, or just clicking the >> button to add all. In this case I just want to deploy to CLIENT1 and CLIENT2, so I will select both, then click the > button. When added, they should move from the list of computers into the Target box. After clicking OK, you will have a few more options you can select before you deploy. One option you will want to set is to change Run as to Logged On User, then clickand Deploy Now.
To learn more about the Run as setting, you can go to https://www.pdq.com/blog/run-options-pdq-deploy/. It is beyond the scope of this basic intro project.

If you have a failure, which you can see under Packages > BitWarden > Targets Box > Status Column, then read the error message in the Error Column. Try to fix that issue, such as a network problem, then right-click on the target row and click Re-Deploy.
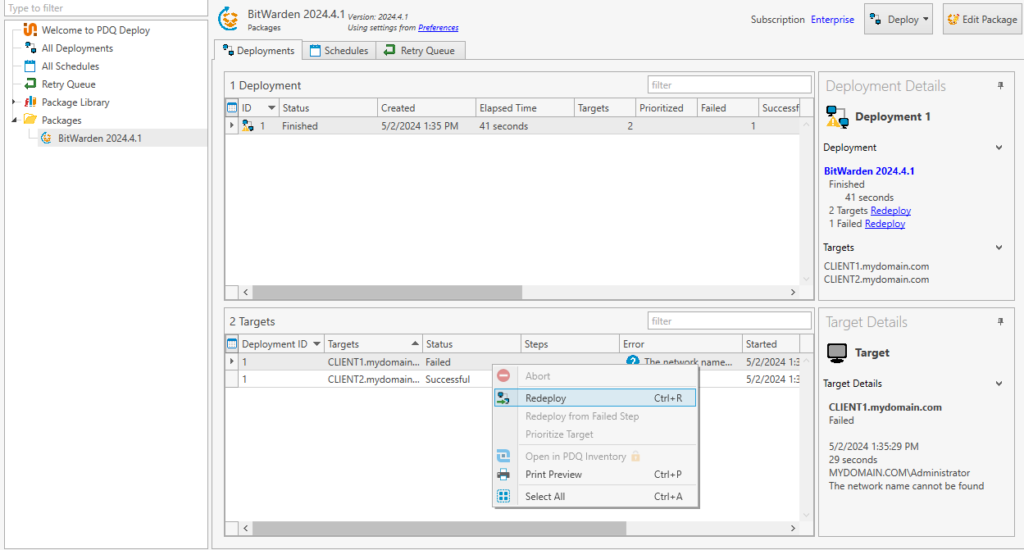
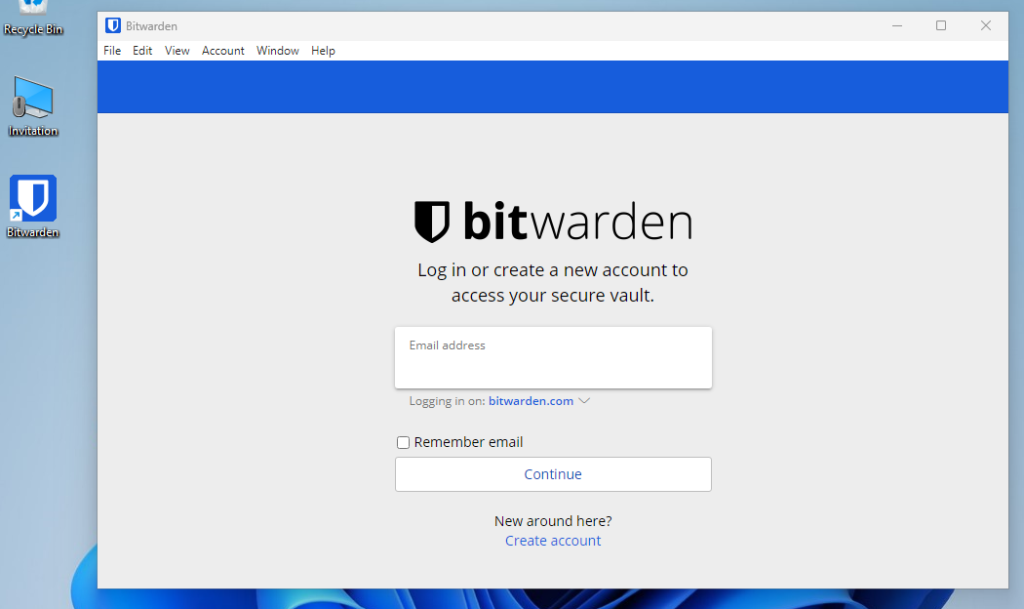
Once successfully deployed, you should be able to sign on to the client computer and have BitWarden in your apps.
Ctrl+Click and Shift+Click Hot-keys
If you weren’t aware of this general hot-key trick, you can holddown Ctrl as you click on multiple items to select them all at the same time. This allows you to highlight multiple objects without highlighting everything in-between those objects. If you did want to highlight everything from one object down to another, then you can hold Shift while clicking on the first and last objects you want to select. This applies in many programs, and even PC games when selecting items from your inventory for example, so it’s a great hot-key trick to know. It’s much faster than clicking and adding each object individually.
Silently Uninstalling Software With PDQ
Not only can PDQ deploy software installation on domain computers, but it can also uninstall that software through a deployment action. The process is same as the installation deployment; however, you will deploy a package called Uninstall BitWarden (in the case of our previous example). These uninstall packages can be found in the same Package Library.
After deploying Uninstall BitWarden, the app will be removed from the computer, even while someone was signed on to it. It doesn’t even need a restart.
PDQ Inventory Enterprise
PDQ Inventory is great for many things, such as seeing all the programs each computer has on it, which Windows Updates it has, system hardware, share folders, and more.
The installation process is the same as PDQ Deploy, so look at that section if you don’t know how to get and install it.
The first thing we are going to look at in PDQ Inventory is the All Computers folder. When you first open it, you may be confused to only see your server VM in the list and have your client computers missing. To fix this, you need to import your computers by syncing PDQ Inventory with your Active Directory domain.
To sync with your Active Directory domain, go to the top toolbar and go to Computer > Add Computers > Active Directory – Sync > Include Container > mydomain. You can also select the Auto Sync Enabled option.


The Auto Sync will sync PDQ Inventory with your Active Directory domain every hour by default. This means that if you add more computers to your domain, you will see it in PDQ Inventory after the next sync.
Now that our computers are in here, we can run a report on one by right-clicking on the computer, hovering over Run Report and selecting which report to run. In this example I will run a report for the Shared Folders. One example of something you can do with the shared folders is add files to a computer.

Alternatively, you could double click on the computer and select which information you want to see from the list.

Another great section to look at is the Computer section, found at the top of the list after double clicking on a computer. This section has many useful pieces of information which you may need such as last boot time, current user, IP Address, MAC Address, OS information, domain information, and system hardware information.
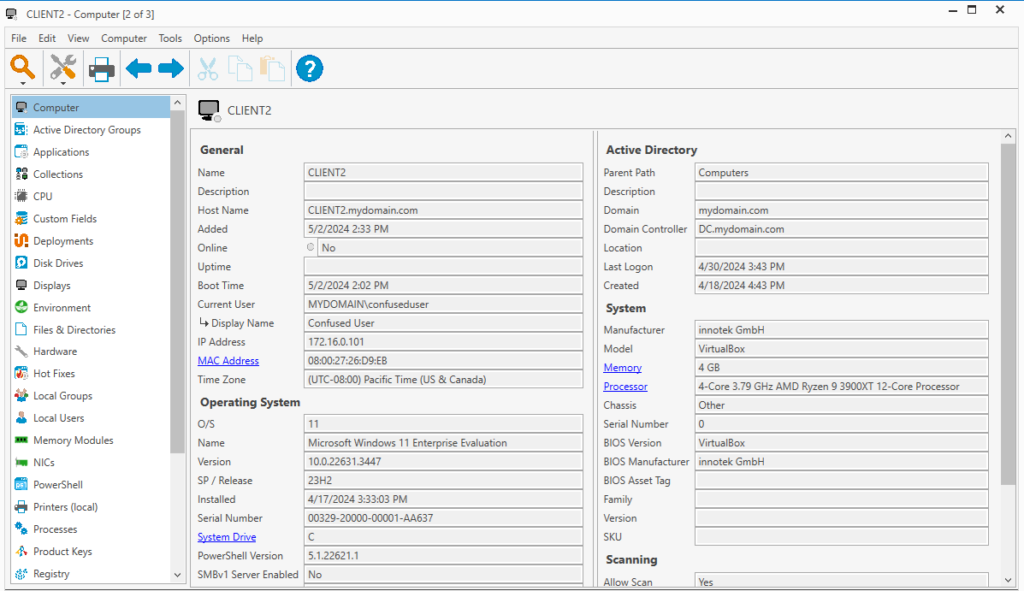
Another section worth noting is the License Keys section. If your organization uses proprietary software that requires a license key, and you want to know which license key that computer has, you can find it in this section.
PDQ Tools
Under the Tools section in the top toolbar, you will find tools that allow you to do many things with domain computers remotely. For example, you can select Run Command to remotely run commands in a domain computer’s Command Prompt. Other options include remotely waking up or shutting down a computer, Remote Desktop and Remote Assist. It also has VNC, which we haven’t covered. It’s also a remote desktop tool that is open source and works for cross-platform use, such as a Windows to Linux connection. Another tool that’s useful to know about is Manage With MMC, which allows you to remotely access a computer’s Computer Management window.
All of these tools can also be accessed by right-clicking on a computer in the All Computers section and hovering over Tools.

This is an all-around powerful piece of software for controlling computers on a domain. We have just briefly reviewed the general capabilities of PDQ Inventory, but it’s really easy to have fun playing around with it and seeing all that it is capable of.
Setting Up a Print Server
Print servers are very commonly used in organizations to manage printing for multiple users.
Server Manager > Manage in top toolbar > Add Roles and Features > Under Server Roles add Print and Document Services > Leave everything else default and install.
I say to leave everything default because we are just going to set up a print server for Windows clients. If you wanted to add LPD, which allows Linux clients to use the print server, or you wanted Internet Printing, then you can add those under Role Services before starting the installation.


After it is installed, open up Print Management from the Server Manager Dashboard’s Tools, found in the toolbar.

To see our domain’s printers, navigate to Print Servers > DC (or whatever you named your domain controller) > Printers.
Here you should see Microsoft Print to PDF and Microsoft XPS Document Writer by default. To add another printer to the print server, right-click in the empty space of the list section and select Add Printer.

We are going to act like we have a printer without actually connecting a real physical printer to the domain. This will allow you to practice, even if you don’t have a printer.
Usually a printer will be assigned a static IP address, so in a production environment you could use that static IP address to add a printer. When a printer is assigned a DHCP address, that address can change when the lease expires. That can cause problems with clients connecting to the printer since they will be trying to connect to the expired DHCP address. A printer will always be on the network so it makes more sense to use a static IP. You could do that for your home printer if you like but I won’t cover that here so we can focus on learning about print servers even if you don’t have a printer.
To continue without having a printer, select Add a new printer using an existing port: and leave the default port. Then click Install a new driver and select any printer driver. You can click Windows Update to get more printer drivers. When I first looked at the drivers, there were only Microsoft and Generic drives. After the update there were countless more drivers. Don’t allow sharing during the setup because we can simulate turning on sharing for a printer that’s already installed, just in case a printer is not properly configured for sharing and you need to fix it.
Configuring Sharing Settings for a Printer
Once you have finished installing it, you should see the printer listed with the original 2 Microsoft printers. Right-click it and go into it’s Properties. Under the Sharing tab you should see the option to Share this printer. This is how you could set up sharing if the printer was not set to allow sharing during the setup process. The option to Render print jobs on client computers is also known as Client-side Rendering. If this is not selected, then Server-side Rendering will be used. This determines where the content being printed gets converted into data that the printer can read. Client-side Rendering will reduce the load put on the server. The other option is to List in the directory, which will list it in Active Directory.

Another important section of the Properties I want us to look at is the Security tab. This is a list of the groups and users who are allowed to access the printer. A fundamental part of information security is the Principle of Least Privilege. This means we don’t want people to have privileges they don’t need, so we should remove any groups that will not need access to this printer. I’m going to add HR to this and remove the group called Everyone. Once that is applied, we should be able to see the printer on Confused User’s account on the CLIENT2 VM.
To access the printer as Confused User, go to Printers & Scanners under the Bluetooth & Devices settings, and click Add device. It should be able to scan Active Directory and see the printer. This is if you selected List in the directory when setting up the sharing settings on the server. If you sign on to the same computer as another random user who is not part of the print server’s security groups, then the printer will just not show up when trying to add a printer.

Installing or Updating a Driver for an Existing Printer
To install a new driver for the printer, or reinstall the driver to fix an issue, you can unselect List in the directory, then you can install a new driver by going to the Advanced tab and clicking New Driver. If you want to install a driver that you downloaded directly from the manufacturer’s website, then click the Have Disk option when looking at the driver selection screen. Once the new driver is installed, you can List in the directory again.
Delegation of Control
Delegation of Control is an easy and simple way to enact the Principle of Least Privilege for Active Directory. It allows a domain Admin to delegate specific permissions to a user or group based on what type of actions they are able to perform in Active Directory. For example, a help desk employee might be given the responsibility of helping users change their passwords, but we don’t want that help desk employee to be able to do anything else on Active Directory. We can just delegate the account to only have the ability to reset passwords.
In Active Directory Users and Computers, right-click on the domain name and select Delegate Control. This will open up the Delegation of Control Wizard. Now add the users or groups you want to delegate control to, but only select multiple users or groups if you want them to have the exact same controls delegated to them. In our example it will just be a new account make in the IT OU with the very creative name of “Password Resetter”. We don’t want to use the same Help Desk account for this because it has Admin privileges.

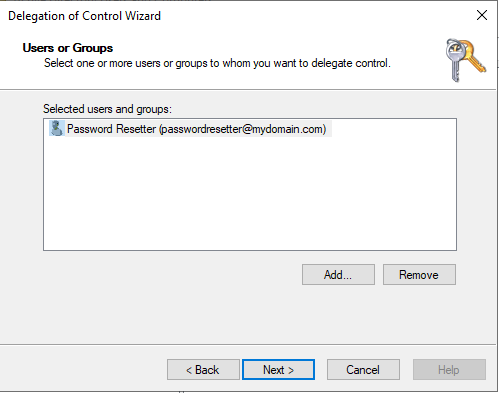
Next there is a list of common tasks which we can choose to delegate to the user. In this case it will be Reset user passwords and force password change at next logon. What this will do is make that user only able to do that single task when using Active Directory Users and Computers. Any other options will still be displayed but will be grayed-out.

To see what this looks like, logon to CLIENT1 with the account we just delegated to. Let’s try something that this user should not be able to do, such as delete Confused User’s account in Active Directory. The option still appears when right-clicking, but when attempted it, just shows an error message saying that you don’t have access rights to perform that operation.

Now let’s try opening Confused User’s Properties and look at the Account tab. You can see that many of the options we previously had while using an account with Admin rights are now grayed-out. The only things that aren’t grayed-out are going to be what we delegated to this account.

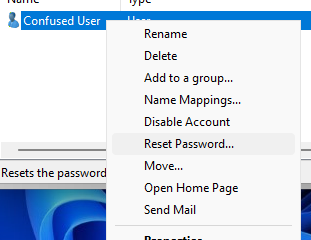
To further test if the delegated control works for this new account, let’s try to reset Confused User’s password by right-clicking and selecting Reset Password. One thing that you should note is that this user does not have the option to unlock the account grayed-out. I’m not sure why this is because if you select that, then you will just get an error message saying that you don’t have access rights to perform that operation. It’s interesting that it is not grayed-out here, but it is grayed-out in the Properties Account tab.

Creating a Custom Task to Delegate
To give this user the access rights to unlock accounts, we have to select Create a custom task to delegate in the Delegation of Control Wizard. It is not listed in the common tasks section like password reset is.

Then select Only the following objects in the folder: and scroll down to the very bottom to check User objects. What this means is that the access rights we are about to delegate only apply for user objects.

The next page has a list of all the permissions that we can delegate. Un-check General and check only the Property-specific box. This will show a list of permissions that apply to specific properties. Now just check Read Lockout Time and Write Lockout Time.

Keep in mind that this does not change the previously applied permission to change passwords. It only added more permissions to the account. Now if you test it out by getting Confused User locked out on CLIENT2, then going to reset password as Password Resetter on CLIENT1, then it should allow you to unlock the account while resetting the password. It should also allow you to unlock the account without changing the password by going into Confused User’s Properties Account tab.
Summary of Part 4
These skills will be valuable for an IT support role; however, there are many other tools and services which were not covered in this series. With so many different tools and services, it can be overwhelming to pick which ones you should learn first. Stick to the most commonly used tools and services first. The most important thing is to actually use them in your practice environment so you can see what problems you might encounter and learn how to work through those problems. With so much information online, there is no reason not to keep learning.
Thank you for reading!

0 Comments