A Series of Posts Exploring the Features of Active Directory and Simulating Common IT Support Scenarios
Skills Developed in This Project Series
Part 1
- How to use important Active Directory tools and features such as: Find, View Advanced Features, Object Properties, and Attribute Editor.
- Creation/deletion, enabling/disabling, and setting expiration dates for User Accounts.
- How and when to use common Command Prompt commands such as
ipconfig,net use,net user, andping. - Connecting computers to the domain.
- Using Active Directory from client computers on the domain.
- Creation of Organizational Units (OU).
Part 2
- Remotely unlocking a user account after repeated failed login attempts, and helping a user reset their password.
- Using Group Policy Editor to set security and password policies for the domain.
- Using the Command Prompt to view information about another domain user’s account.
- Enabling/disabling a computer account on the domain, and how to add the same computer account back to Active Directory after deletion.
- Creation of share folders on the domain controller and mapping those shares to users’ computers.
- Creating Security Groups, editing permissions, and disabling inheritance.
- Configuring the automatic creation of folders for individual users within a share drive.
Part 3
- How to enable and use Remote Desktop, Windows Remote Assistance, Remote Administration Tools such as Remote Registry, and remotely accessing a computers file system.
- Using Group Policy Management to remotely disable services on a computer or user account through Computer Configuration or User Configuration options.
- Using important Group Policy commands such as
gpupdate /forceandgpresult /r. - Using Group Policy Wizard to generate reports.
Part 4
- Installing and using PDQ Deploy Enterprise to silently install and uninstall software on computers remotely without disrupting the user.
- Installing and using PDQ Inventory Enterprise synced with Active Directory to run reports and remotely manage computes on the domain.
- Creating a print server, installing/updating print drivers, configuring sharing settings for a printer, client-side vs server-side rendering, and accessing the printer as a user.
- Understanding the importance of Delegation of Control, and how to use the Delegation of Control Wizard to assign common task permissions as well as create custom tasks to delegate.
Remote Desktop
Enable Remote Desktop
The method I’m going to use here is through the Control Panel. The nice thing about learning how to access things through the Control Panel is that it applies the same for Windows 10 and Windows 11. I will be doing this under the Confused User account on the CLIENT2 VM.
Open the Control Panel and click System and Security. In the System section, click Allow remote access. This requires administrator permissions, so you will be prompted to enter the credentials for an admin account on the domain. This should open up System Properties. Under the Remote Desktop section, select Allow remote connections to this computer. Click the Select Users button and add the Help Desk account. You could also add a whole group if you wanted to.


If that worked correctly, then the Help Desk account should be able to connect to Confused User’s computer through Remote Desktop. To test this, get on the CLIENT1 VM and sign on as Help Desk. Use the search bar to search Remote Desktop Connection. Here you can enter the computer’s name. If it was on another domain name then you would put the domain as well, but we can just enter CLIENT2 since it is on the same domain.

While connecting, you may get a warning that a user is currently logged in on the computer you are trying to Remote Desktop connect to. You will also see a pop-up on CLIENT2 which requires the user to accept the incoming Remote Desktop connection from CLIENT1.

When you are connected to CLIENT2, you will be signed on to CLIENT2 as Help Desk. If you wanted to access files from the Confused User account, you can see them by going to the local disk C: in File Explorer, and going into the Users folder.
To end the Remote Desktop session, you can click the X at the top of the screen where it says CLIENT2.
Remote Administration
Remote Registry
While Remote Desktop allows access to the entire desktop, Remote Administration Tools allow things like remotely editing the registry of the computer. If you open regedit, or Registry Editor, on the Help Desk account in CLIENT1, there is an option under File in the toolbar called Connect Network Registry. If you then enter CLIENT2 as the name of the computer to connect to, it will give an error message. This is because Remote Desktop being allowed doesn’t enable all types of remote services.


To enable CLIENT1 to remotely access the Registry of CLIEN2, a couple of services need to be running. To start, open the Services with right-click Run as administrator on CLIENT2. In the services, we need to start both the Remote Access Connection Manager and Remote Registry. Services can be started from inside their Properties. For the Remote Registry service, we can change Disabled to Automatic and apply that change to un-gray the Start button.


Now we must also start Remote Registry on CLIENT1 using the same process.
Although the services are running, you will most likely encounter a problem with the CLIENT2 firewall, which blocks the Remote Registry connection. A quick way to fix this for a practice environment is to disable the firewall on CLIENT2, but that wouldn’t be great practice for a work environment. Instead of disabling the firewall, we can make a rule which allows the inbound traffic on TCP port 445. If you’ve taken a CompTIA A+ type of certification, then you should remember TCP 445 as SMB.
To access the firewall settings on CLIENT2, open Settings > Privacy & Security > Windows Security > Firewall & network protection > Advanced Settings.


Now inside Windows Defender Firewall with Advanced Security click Inbound Rules on the left, then click New Rule… on the right. Set the rule type to Custom.
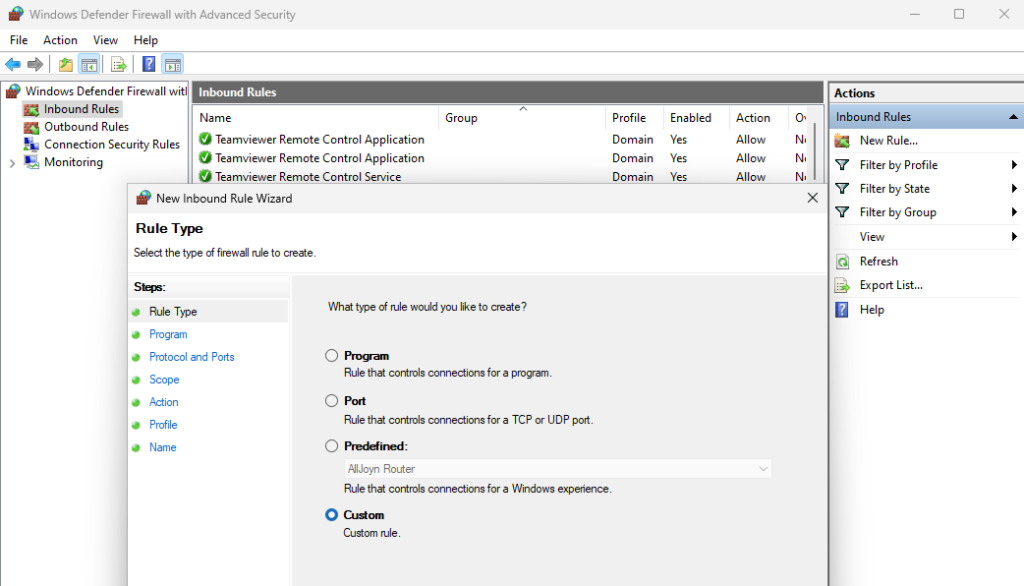
I’d like to point out that the rule we will make is very basic; however, it could be made much more specific, and thus more secure. We could make it only apply to a certain IP address for example. For this project, we just want a basic rule allowing inbound traffic on port 445 so that we can use remote registry without completely disabling the firewall.
Under Protocol and Ports, set Protocol Type to TCP. Then set Local Port to Specific Ports and enter 445.

To keep it simple, just leave the rest default and name the rule to finish. This should now allow Remote Registry to work; however, it will only work in one direction. CLIENT1 will be able to remotely access CLIENT2’s registry, but it won’t work the other way around.
To connect CLIENT1 to CLIENT2’s registry, enter CLIENT1’s Registry Editor and click File to select Connect Network Registry. Then type CLIENT2 into the box. If something didn’t work, then an error message will show. If successful, then you should see CLIENT2’s Registry in the left side of the screen.


One problem I had that I would like to mention, is that I had all the services started, but for some reason the CLIENT2 VM lost connection to the domain. It seems to have been a Virtual Box issue. If you encounter this problem, the easiest first step is to just restart the VM. I have encountered a similar issue with “Drag N’ Drop” not working for a VM at random times despite it still being enabled in the VM’s settings. This too can be fixed with a restart.
One advantage to using Remote Registry instead of Remote Desktop is that Remote Registry will not disrupt the user’s computer use like Remote Desktop would. When you use Remote Desktop, the user completely loses access to their computer until you are done. If you hop on to CLIENT2 while CLIENT1 is connecting to it’s Registry, you can see that it’s not disrupting CLIENT2’s ability to work normally.
Remotely Accessing Another Computer’s C: Drive From File Explorer
Another way to get access to CLIENT2’s file system is through CLIENT1’s File Explorer. The process is very similar to how CLIENT2 was able to access the share drives on the Domain Controller VM. The difference is that instead of typing in the server name, we will type in the computer’s name.
\\CLIENT2\c$

From here, you can basically do whatever you could do if you were logged in on that computer. You can delete folders, for example. You could also drag and drop files from CLIENT1 onto CLIENT2.
Windows Remote Assistance
An Alternative to Remote Desktop
Windows Remote Assistance is a different app than Remote Desktop. Windows Remote Assistance includes a chat box, doesn’t kick the user out, and starts out as a screen share with full control belonging to the user. The person assisting must receive an invitation file, and they are only able to control the user’s desktop once given additional permission after already connecting.
Despite being separate applications, they both use RDP to function, so you still need to enable Remote Desktop.
We will first open Windows Remote Assistance on CLIENT2.This can be done by pressing Windows Key+R to open up a Run window, then entering “msra” (Microsoft Remote Assistance). You could also just type “msra” into the search bar and it will offer to run it with Run for you straight from there.

We want CLIENT2 to invite CLIENT1. On CLIENT2 click Invite someone you trust to help you. There are multiple ways to invite; however, in our situation we already have the ability to use what we just learned to access files on CLIENT2’s C: drive from CLIENT1. This would also be more user-friendly for the user of CLIENT2 because you could just instruct them to save the invite file to their desktop. To go this route, click Save this invitation as a file, then save it to the Desktop. You could also email the file.

Now go onto CLIENT1 and open up Windows Remote Assistance with “msra”. Click Help someone who has invited you then Use an invitation file. Now, from inside the File Explorer window that has popped-up, remotely access CLIENT2’s C: drive as we have done previously so that you can access the invitation file saved on CLIENT2’s Desktop. To find that file, navigate to \\CLIENT2\c$ > Users > confuseduser > Desktop > Invitation.

You should then be prompted to enter a password. This password is in a pop-up window on CLIENT2 which appeared right after you saved the Invitation File. The user could tell you that password over the phone if that is how you were communicating.
After the password has been entered on CLIENT1, you should get a new maximized window which is black. It is waiting for acceptance from CLIENT2.

After accepting, CLIENT2 should be able to see CLIENT1’s screen, however you will notice that CLIENT2 is in control of the cursor. The user could show Help Desk what problem they are experiencing, and Help Desk can either give suggestions through the chat box, or ask to take control.
To open up the chat box as Help Desk, click the Chat button in the toolbar of the entire window. The Chat button inside the desktop view screen is not yours, it’s just showing you the users screen there.
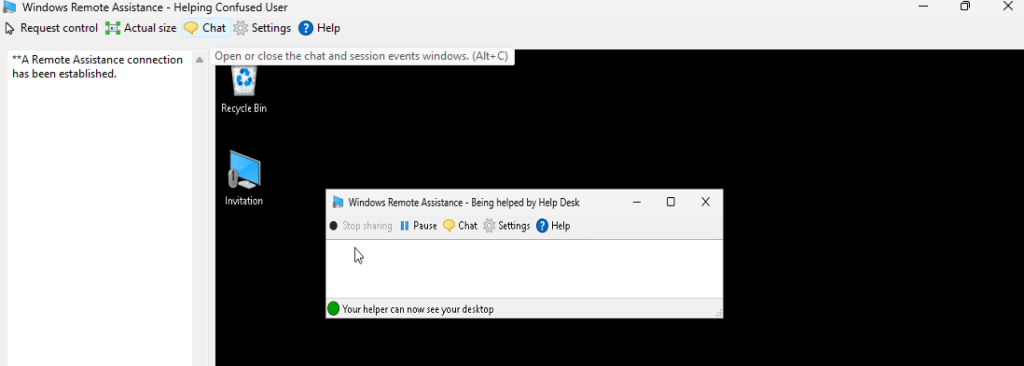
Let’s assume you asked for control of the user’s desktop in the chat and the user said they will let you take control. The way to initiate that is to click the Request Control button in the toolbar. This will prompt the user for approval before fully giving over control. You should be able to see that from the Help Desk’s view of the users screen. After that, it’s very similar to Remote Desktop.
Group Policy
Group Policy Commands
The gpupdate /force command will force an update of the group policies. This can be run in the command prompt as any normal user. If the update is done to a user account, then the user will not have to sign out and sign back in; however, if it is done to a computer, then the computer will need to restart.
The gpresult /r command will display RSoP summary data. This includes information such as the user’s settings, applied group policy objects, and security group memberships.

How to Get Help With a Command Prompt Command
If you are ever unsure of which argument/option to use with a command, you can get a list of them and help on how to use them by adding /? after any command. It is the Windows equivalent of adding -help to a command in the Linux or Mac OS terminals.

Using Group Policy To Disable Task Manager
As an introductory example of using group policies to disable certain programs or services on a client, we are going to disable Task Manager for a specific OU from Group Policy Management.
On the server VM, open Server Manager and click on Tools to select Group Policy Management from the drop-down menu. Inside the directory tree, navigate to Group Policy Objects underneath mydomain.com. Right-click it and select new.

I will name this new GPO Task Manager Disabled. After clicking OK, you can then click on the new GPO, and click on the Delegation tab. This is where you can add permissions to certain users and groups. Let’s set Confused User to have read permission. By now you should be able to figure out how to do that, as this is petty similar to previous things we’ve done in the project. This whole step isn’t really necessary, but it’s good to see where delegation is done and how it works.

Now we can make this rule actually do something by right-clicking it and selecting edit. This will open the Group Policy Management Editor. Before showing you exactly where the task manager disabling rule is, I want to give an overview which will apply to any rules you make in the future.
Notice how there is a parent directory called Computer Configuration, and another called User Configuration. It is important that you find the rule within the right one, because a rule in computer configuration will apply to the device as a whole, while user configurations apply only to the user. With this example, if we disabled Task Manager for the computer, then even an admin account wouldn’t be able to open it, whereas if we only disable Task Manager for a user or group, then Task Manager could be run by opening cmd as Administrator.
For this rule, it should be found within the User Configuration folder, under Policies > Administrative Templates > System > Ctrl+Alt+Del Options.

Click on Remove Task Manager, and click Enabled.
With the rule defined, we can now simply drag and drop it into the OU we want it to be applied to. For this example drag and drop it into the HR OU. This will link the policy to that OU. Click on the HR OU and you should see the new policy listed under it. Right-click and select Enforced.
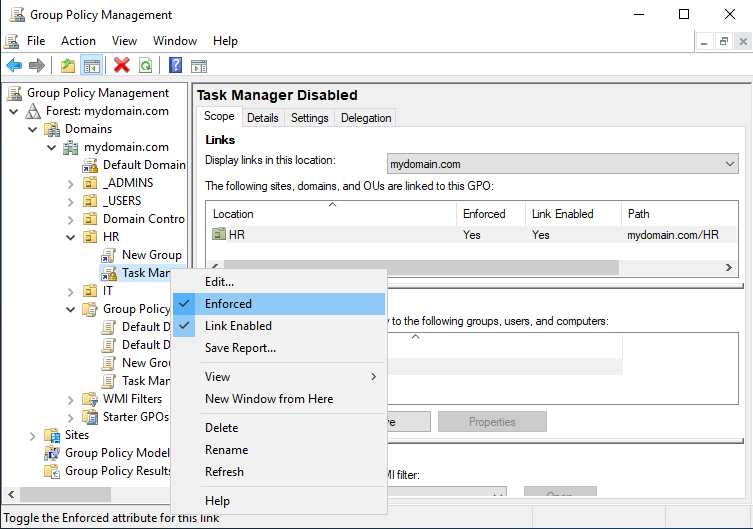
Now hop onto CLIENT2, signed in as Confused User, and run gpupdate /force in the command prompt.

When clicking on Task Manager, you should get a message saying that it is disabled by the administrator.

When running the gpresult /r command as Confused User, it now shows the new policy.

In order to use Task Manager on this computer now, you have to open the Command Prompt as Administrator, enter administrator credentials, then run the command taskmgr. This is why we made the policy user based rather than computer based.
Removing the Option for Users to Shut Down or Restart
Here is something you can try on your own to experiment with making different GPO’s.
This example follows the same process of making a Group Policy Object and enforcing it on users.This is a good example because it is being used to prevent remote employees from accidentally shutting down a computer which they are remotely connecting to through a VPN. The natural habit is to turn off the computer when you are done; however, we don’t want them shutting down the actual computer when all they should be doing is signing out of their remote connection. By removing this option, we can be sure they will only have the option to sign out without shutting down the computer.
Group Policy Wizard
The Group Policy Wizard is capable of generating reports on users. To access it, right-click on Group Policy Results at the bottom of the directory tree.

Within the Wizard, we can get a report for Confused User. Hit next, and in Computer Selection click Another Computer and enter the computer name or use the browse feature to find it. In this example I will use CLIENT2 because that’s the computer that Confused User is using. Keep in mind you need to type it out as MYDOMAIN\CLIENT2.
Summary of Part 3
These remote services are essential in IT, and are useful far beyond just Active Directory domains. If you want to help a friend or family member with a computer related issue without being there with them, then remote desktop services will be very useful. This series is primarily focused on Active Directory domains, so you will need to do a few things differently when using Remote Desktop over the internet. It is a skill worth practicing. In the next part of the series we will explore even more remote options using software made by PDQ. We will also look at print servers and Delegation of Control.
0 Comments