A Series of Posts Exploring the Features of Active Directory and Simulating Common IT Support Scenarios
Skills Developed in This Project Series
Part 1
- How to use important Active Directory tools and features such as: Find, View Advanced Features, Object Properties, and Attribute Editor.
- Creation/deletion, enabling/disabling, and setting expiration dates for User Accounts.
- How and when to use common Command Prompt commands such as
ipconfig,net use,net user, andping. - Connecting computers to the domain.
- Using Active Directory from client computers on the domain.
- Creation of Organizational Units (OU).
Part 2
- Remotely unlocking a user account after repeated failed login attempts, and helping a user reset their password.
- Using Group Policy Editor to set security and password policies for the domain.
- Using the Command Prompt to view information about another domain user’s account.
- Enabling/disabling a computer account on the domain, and how to add the same computer account back to Active Directory after deletion.
- Creation of share folders on the domain controller and mapping those shares to users’ computers.
- Creating Security Groups, editing permissions, and disabling inheritance.
- Configuring the automatic creation of folders for individual users within a share drive.
Part 3
- How to enable and use Remote Desktop, Windows Remote Assistance, Remote Administration Tools such as Remote Registry, and remotely accessing a computers file system.
- Using Group Policy Management to remotely disable services on a computer or user account through Computer Configuration or User Configuration options.
- Using important Group Policy commands such as
gpupdate /forceandgpresult /r. - Using Group Policy Wizard to generate reports.
Part 4
- Installing and using PDQ Deploy Enterprise to silently install and uninstall software on computers remotely without disrupting the user.
- Installing and using PDQ Inventory Enterprise synced with Active Directory to run reports and remotely manage computes on the domain.
- Creating a print server, installing/updating print drivers, configuring sharing settings for a printer, client-side vs server-side rendering, and accessing the printer as a user.
- Understanding the importance of Delegation of Control, and how to use the Delegation of Control Wizard to assign common task permissions as well as create custom tasks to delegate.
Simulating Helping Someone Unlock Their Account
Setting an Account Lockout Policy in Group Policy Manager
A very common reason for a user to call support is because they are locked out of their account. There are various reasons this could happen, but for this example scenario it will be because of too many failed login attempts.
To create these conditions, we must first set a Group Policy which locks out a user after 5 failed login attempts. This can be done from the Group Policy Manager. This is found in the Server Manager Dashboard under Tools.
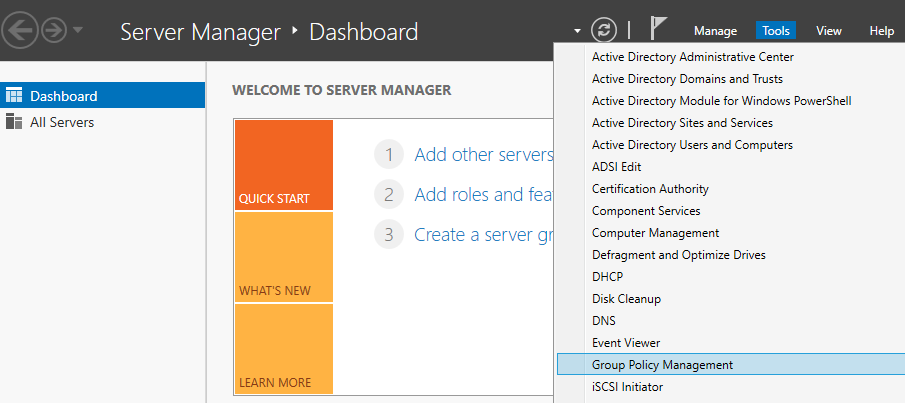
We only have one domain, but if you did have multiple domains, they could each have different policies. Within the domain, policies can be set for different groups or OU’s.
Navigate to the Default Domain Policy for the domain. Within Default Domain Policy, click on the Settings tab.

In the Settings tab, if you click on a section then it will expand. Click on Security Settings underneath Computer Configuration. If you click on Account Policies/Account Lockout Policy, it will tell you how many invalid logon attempts it will allow before lockout.

To change this, right-click on Default Domain Policy in the directory tree, and click Edit. Navigate to Computer Configuration > Policies > Windows Settings > Account Policies > Account Lockout Policy. By going into the Account Lockout Duration Policies, we can define how many minutes the Lockout will last. I am going to use 10 minutes, so we have enough time to practice fixing this issue once we get to the help desk simulation stage. To set how many attempts until lockout, click on Account Lockout Threshold. 5 attempts is a pretty common setting for this. Then close the Group Policy Manager Editor window, and right-click the Default Domain Policy to click Enforce. If you right-click again afterwards, it should have a check mark and say Enforced.


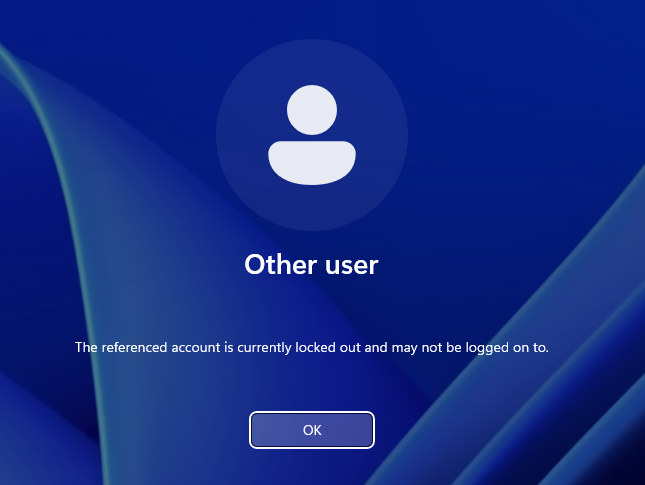
With the proper password lockout policies set, we can test if they work by repeatedly failing to type the correct password when signing in to either client VM. After the set number of failed logon attempts, you should receive a message which tells you that account is locked out. Keep in mind that this is locking out the account, not the client computer/VM. This means that you should not be able to logon with that account on another computer/VM on the same domain. This also means that you can logon with a different account on the same client. One tip to make this go faster is that if you click Other user and sign in there, then it will tell you the password is incorrect immediately. If you try to do it on the locally stored Confused User account, then it will have wait time’s between password attempts.
Help a User Resolve an Account Lockout Issue
First, create the problem by repeating what we just did. Purposely fail to logon to the confuseduser domain account 5 times in a row to get the account locked out. Now we can jump back over to the Help Desk client to practice fixing this issue for the user.
Open up Active Directory Users and Computers to find the user’s account with the Find tool. You should have the Find tool memorized by this point since we have used it a few times. You should also remember how to get to a user’s Properties by now. In the Properties, click on the Account tab. Here you will see a check box labeled Unlock Account. It should also say This account is locked out on this Active Directory Domain Controller next to it.


If you check the box, then click Apply, the screen will refresh with the box no longer checked. It has actually applied, it just un-checks the box after you click Apply. It also still says the account is locked, but when I go to Confused User’s client, it no longer is locked. Also if you click OK without clicking Apply, it will still unlock the account, and if you reopen the Properties, it will correctly remove the Account is Locked notification. To confirm it worked, go logon to the Confused User account on the other client.
Disabling a User’s Account
There are many reasons you would want to disable a user’s account without deleting it. These aren’t just for situations where someone is fired. One example is when an employee takes a long period of time off from work. This could be maternity leave, for example. There is no reason for the account to be enabled, and it actually is just a potential security risk. By leaving the account active while it is not needed for a long period of time, you open up an opportunity for an attacker, or maybe even another employee, to logon to their account to see information they shouldn’t be able to see.
Now that you have some context for why an account might be disabled, let’s see how it can be done. In Active Directory Users and Computers, simply right-click on the user’s account to find the Disable Account option. After disabling it, you should get a pop-up notification that the account has been disabled. Before mindlessly moving on to the next task, make sure to read that notification and double check that you disabled the correct account.

One thing that’s important to know is that a disabled account will have a downward pointing arrow in the person icon; however, if you disabled the account from the Find tool, then you may notice after clicking OK on the pop-up notification, that there is no downward pointing arrow on the person icon in the Find results. That is because it needs to be refreshed. It can be refreshed by just clicking the Find Now button again and effectively searching for the same account again, or it can also be refreshed by clicking View in the toolbar, and selecting Refresh.
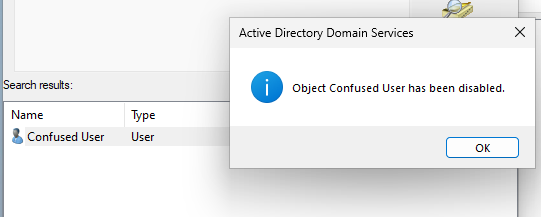
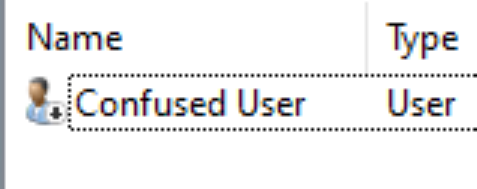
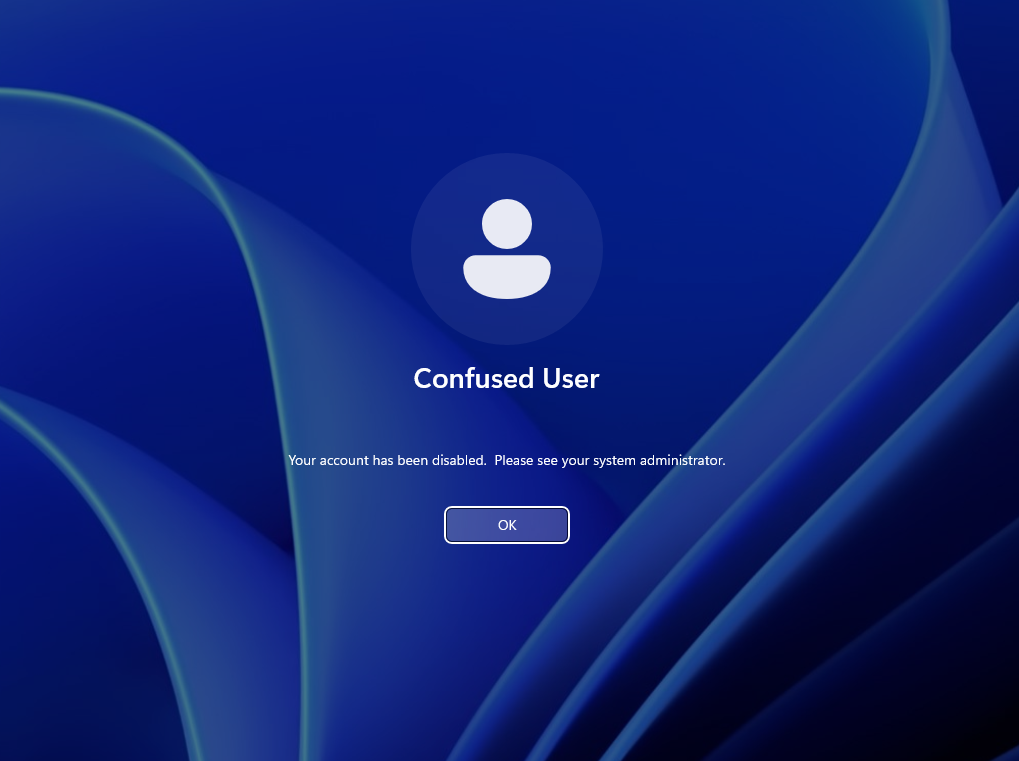
We can confirm if the account is disabled by attempting to logon to the Confused User account on the client. If that user is logged in when you disable the account, then you may have to restart the client before it takes effect. Once it’s in effect you will be told the account is disabled after you enter the password during a sign in attempt.
Enabling a Disabled User Account
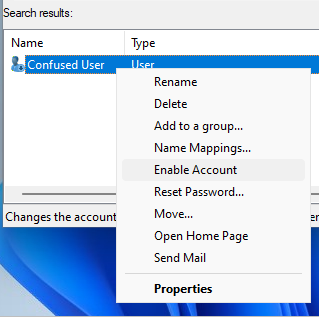
Enabling a user’s account is almost the same process as disabling. It just requires you to right-click a user, then select Enable Account. The downward pointing arrow on the person icon should no longer be there, however it does require you to refresh before the icon will be updated.
Changing a User’s Password
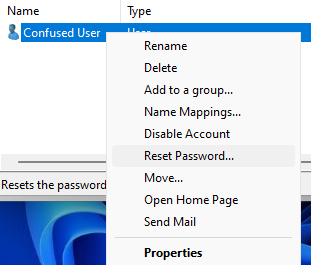
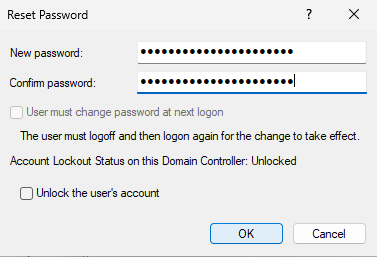
The option to change a user’s password is found by right-clicking the user’s account, just like disabling /enabling the account. Once we reach the Reset Password screen, we have several options. If you simply wanted to give the user a new password, then just type the new password and click OK. It also gives the option to check the box below, which is labeled User must change password at next logon and has a description of The user must logoff and then logon again for the change to take effect. If that option is grayed-out, meaning you can’t select it, then it is probably because that user’s password is set to Password never expires or User cannot change password. Those must both be unselected to use this option.
Selecting that option allows a user to logon using the new password you created for them, but they are forced to immediately create a new password for themselves upon logon. This makes it so that the password you typed in for them in Active Directory is more of a one time password to allow them to change their own password. This is more secure than just giving them a new password.
Many times, a user may incorrectly enter their password multiple times until they are locked out. After they get locked out they call to have their account password changed, but also need their account to be unlocked. For this reason, we have the option to Unlock the user’s account as well as an indication of the lockout status on the account. It’s good to know this, so you don’t go through the process previously covered to unlock an account if you already have to change the user’s password anyway.
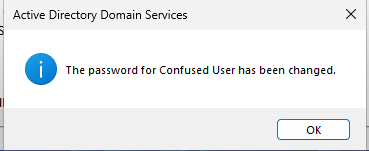
When completed, a notification will pop up.
User’s Account Has Expired
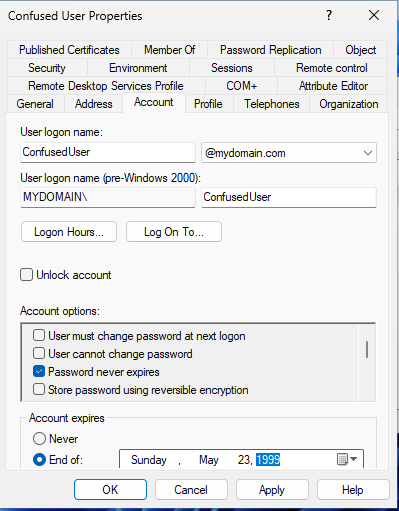
The Account Expires setting for a user’s account can be found inside the user’s account Properties under the Account tab. It is located at the bottom of the Account tab. You should see that it has 2 options, Never and End of:. Selecting the Never option will make the account never expire. This isn’t always the best idea from a security perspective. You don’t want to have an employee get terminated or leave the company and still have an active account on the company domain. If they were a contracted hire, meaning they had a set end date in their employment contract, then you could set the account to expire at the end of their contract period. It can always be extended if they renew their contract. This is just one example of how an expiration date could be determined. There are situations where you would want an account to expire, but you don’t want to totally delete it from the domain, which the expiration setting could be useful for. This also saves you if you forget to disable the account later for some reason.
To set a particular expiration date, simply set the date of expiration in the box next to End of:. Even if you are not in charge of setting future expiration dates, it’s important to know about this so you can help a user whose account has expired. If a user attempts to logon to the domain and they receive the message The user’s account has expired, then changing the End of: date to a future date or selecting Never will give them access again.
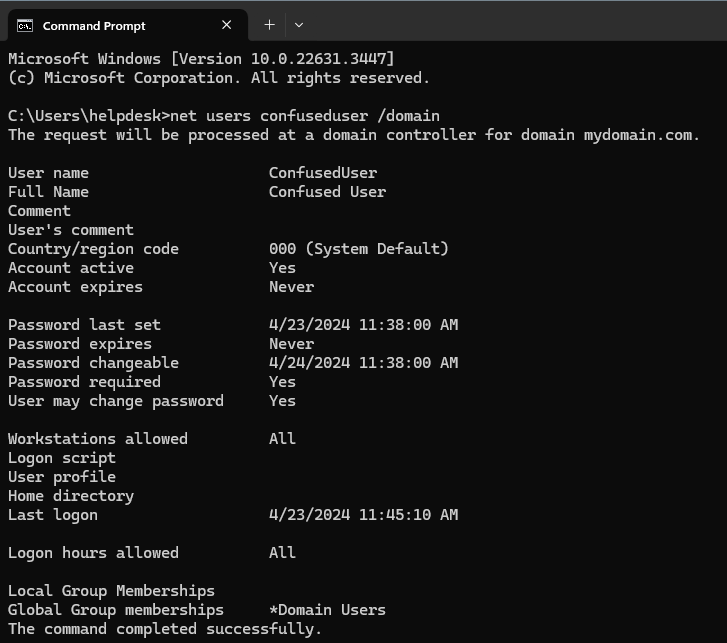
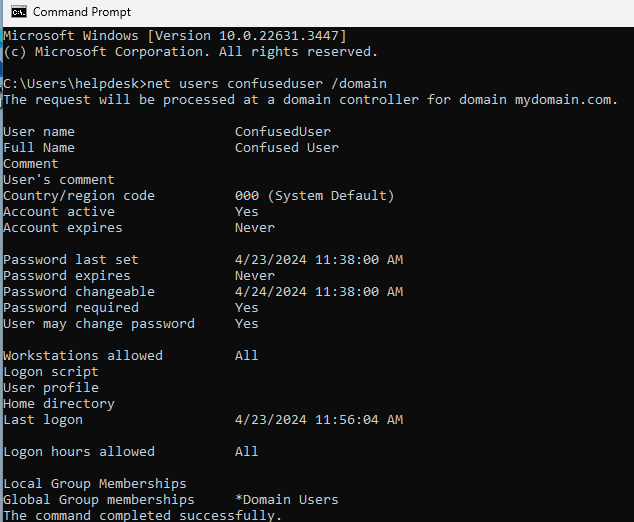
Seeing Information About a User Account from the Command Prompt
net users username /domain
In this example: net users confuseduser /domain
This command provides information about a user account retrieved from the domain controller. This command can be used on any device connected to the domain. For certain information, using this command will be faster and easier than opening up Active Directory Users and Computers. This would also be useful if the Active Directory GUI tools are not installed on a computer. To illustrate this, I signed in as Help Desk on CLIENT2, which does not have any Active Directory tools installed on it. The only thing it needs is a connection to the Domain Controller. The results were the same on both CLIENT1 and CLIENT2.
Disabling a Computer Account
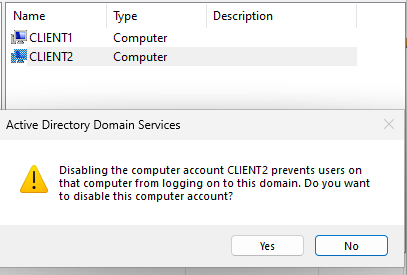
While the process of disabling a user account is fresh in you mind, I want to briefly cover disabling a computer account. The process of disabling it is the same. It’s just right-clicking on the computer account in the Computers OU, then selecting disable.
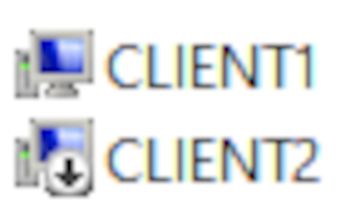
The important thing to understand about disabling a computer account in Active Directory this way is that it doesn’t disable the device itself. The computer will still remain on if it was already on, and will still be able to turn on if it was off. What it is doing exactly is made clear by the alert message that appears after you disable the computer account. All you are disabling is the ability for a user to logon to the domain through that computer. This doesn’t prevent a domain account from logging into the locally saved account they have on the client. When you sign in to a client using your domain account, it will make a local version of that account. Also you will see a downward pointing arrow on the computer icon in Active Directory when the computer account is disabled, just like you would see on a disabled user account.
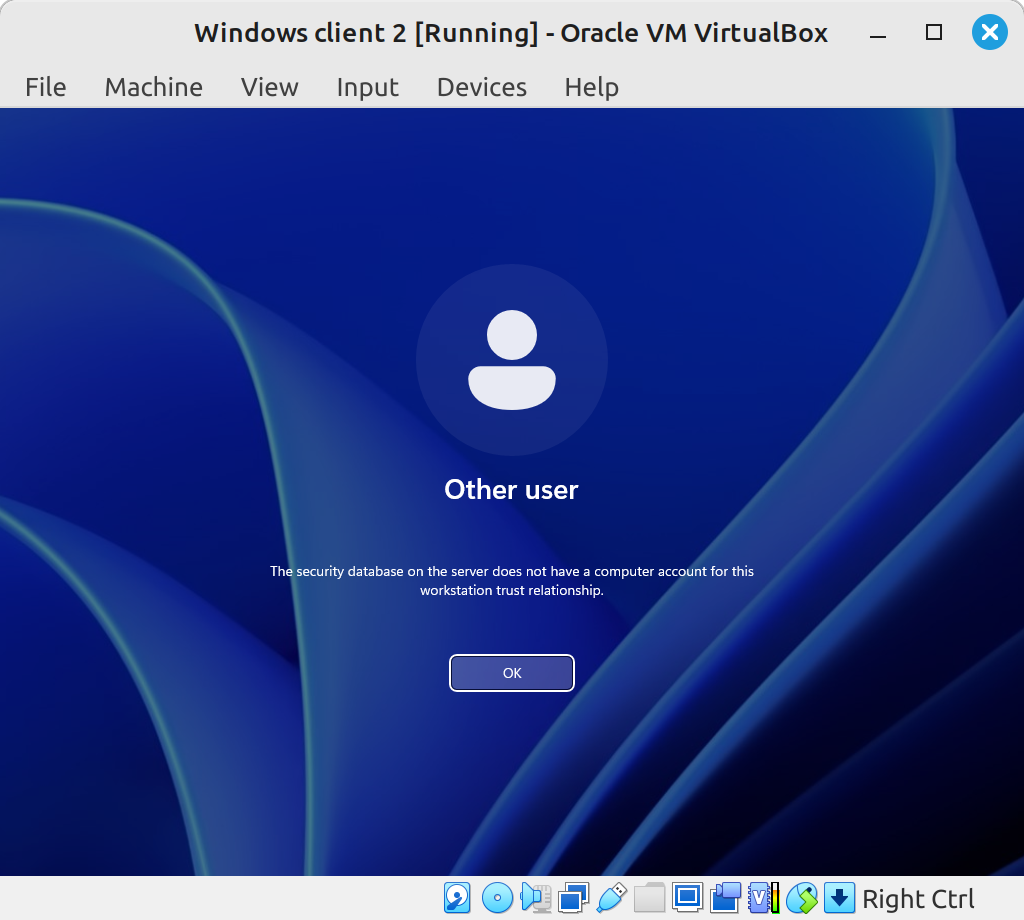
The process for enabling a disabled computer account is the same as enabling a user account. Also you should take note that with many of these various changes we make, such as disabling user accounts or disabling a computer account, the changes may not take effect until signing out and attempting to sign back in, or restarting the computer. Keep that in mind for when you aren’t seeing an effect from a change you made. Not all changes are like this, but it’s good practice to assume you may need to restart or sign out and try to logon again. As mentioned, you will still be able to sign in to a locally saved account. To test this in action you need to try to sign in to a domain account that has not previously signed in to that client.
What Happens if you Delete a Computer Account
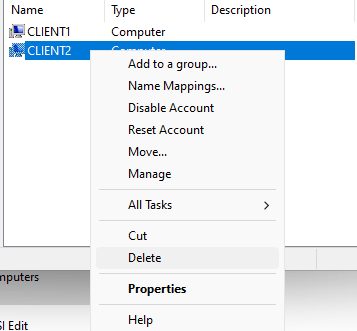
Much like disabling a computer account, deleting a computer account from Active Directory will prevent domain users from signing in to that device unless they already have their account locally saved to the device. It’s possible you may click Delete after right-clicking on a computer account, as it is just above the Properties option. It is still unlikely that you would actually delete the computer account because you must then confirm the deletion by clicking Yes on an alert pop-up. Maybe if you are in a rush and you thought you clicked something else, then clicked Yes without reading the pop-up, you could delete the computer account.
I’m sure it’s happened before, however it is not too difficult to fix the mistake. It’s possible to just make a new computer account by the same name in Active Directory, and then the computer will be associated with the new account since the computer still has that name. This isn’t necessarily the best way, and may not be what you are supposed to do according to your organization. The other way to reconnect the device is to repeat the process of renaming the device and connecting to the domain again, just like what we did when we first made the client VM.
Just as a refresher, you would sign in to the computer using a local account, navigate to Settings > System > About and click on Domain or workgroup. From there you click Change and enter the computer name and domain.
This process is also what you would do if a computer has “fallen from the domain”. Fallen from the domain means the computer no longer is part of the domain for whatever reason.
Creating Shares and Using Security Groups
Creating Share Folders for the Domain
This can be done from the Server Manager on the Windows Server 2019 VM. From the Dashboard, click on File and Storage Services on the left side of the screen, then select Shares. You can right-click in the area that lists the shares to create a new share.


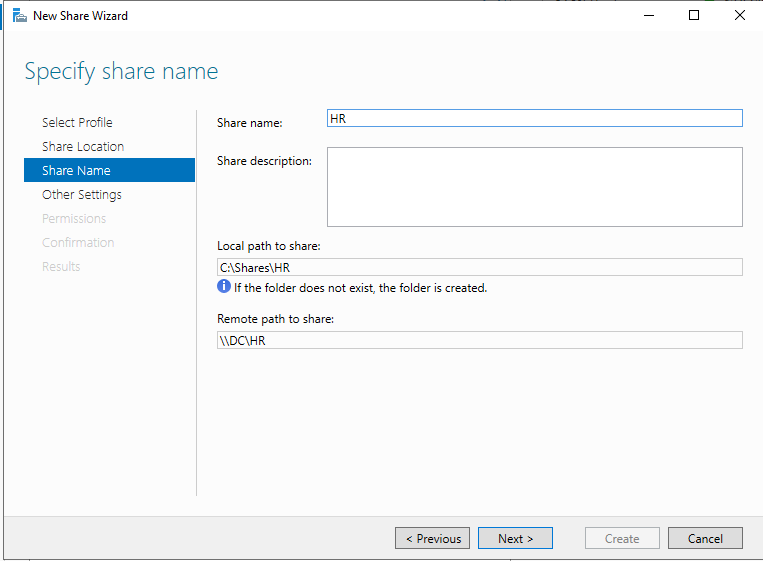
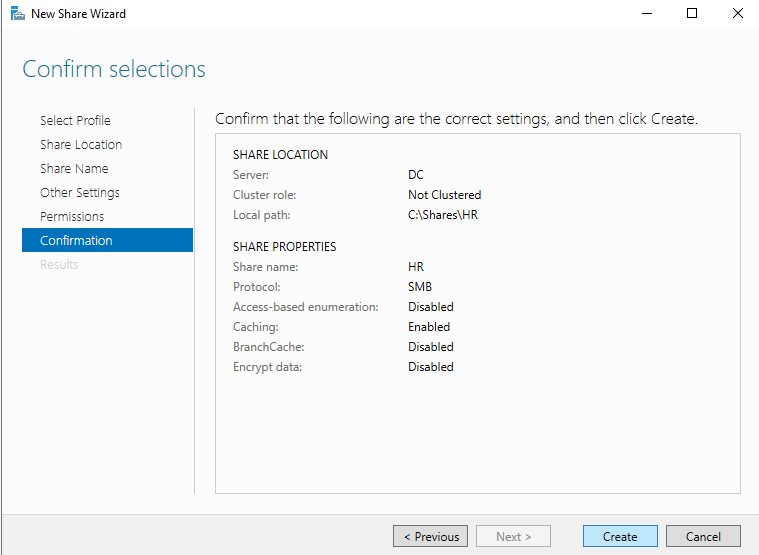
Let’s just leave the defaults for Select Profile and Share Location. We will then have to enter the share name. Earlier we made an OU for HR, and Confused User is in HR, so let’s name this share HR. If you look at Local path to share, you can see where on this server the share folder is located. By default it will be on the C drive of the server. Underneath that is the Remote path to share, which is the path a client would use to reach the share. Make sure that you can look at a path and understand what it means. In my example “DC” in the path name is the name of the server. If you just named your server “WindowsServer2019”, then you will see that instead of “DC”. When you are using a Command Prompt or Linux terminal, you won’t have a nice GUI to show you the parent directories for files. It’s not entirely essential for this project, but I just want to make sure you aren’t ignoring everything other than exactly what I’m telling you to do.
After naming the share, we will leave everything else default by clicking Next until you can click Create. Once that is done, make another share by repeating the same process. I named the 2nd share “Personal”.
Creating Security Groups
Security groups allow us to give access to certain resources on the domain to entire groups of users. The reason we made 2 shares in the previous section is to allow us to make 2 different security groups which each have access to different shares. If a user is in a certain security group, then they will have access to the same things as everyone else in that same security group. This allows an organization to limit access to those who need it without giving access to anyone who doesn’t need that share.
To get started, we need to make a new group in Active Directory Users and Computers. This process is very similar to creating a new user. Simply right-click on the OU in which you want to create the new group, then hover the cursor over New, and click Group. In this case we need to make a new group in the Users OU.
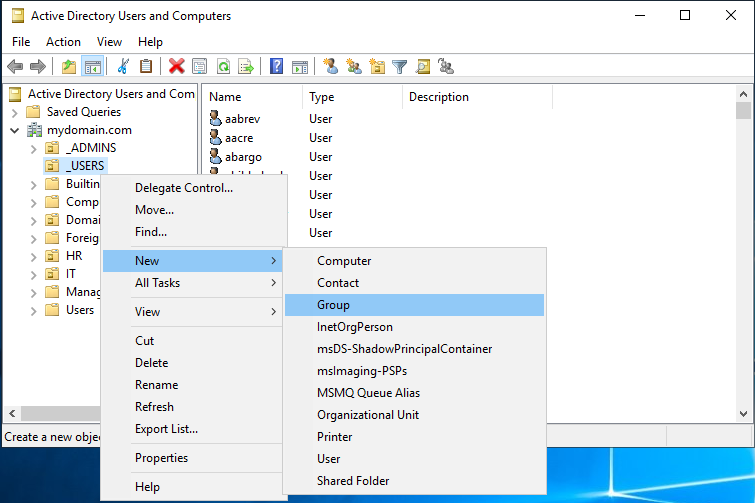
When creating the group, set the Group Type to Security. I’m going to name it HR. Repeat this for the share folder named “Personal” by creating a group named “Personal”.

Right-clicking on a group gives the option to view Properties, just like with a user account. Inside Properties, there is a Managed By tab. This tab allows you to change the user, group, or security principle that manages access to the group.

Another important part of the group’s Properties is the Members tab, which is where you add the user accounts to the group. Click Add, then in the new window you can enter the users. If you type in a name, and click Check Names, then it will show you if you entered a proper name. In this example I typed “confuseduser”, and the Check Names function retrieved their full name. It also worked when I typed in just “Confused”; however, that’s just because it’s a unique name in the database. You can also enter multiple names at a time, or enter other objects such as another group.

To quickly see what groups a user account is a member of, you can look at the Member Of tab in the user account’s Properties.

Share Properties
A share folder’s Properties contains a Security tab, which is where permissions can be changed for that share folder. To access this, you can open the File Explorer on the server VM, and navigate to the shares. Here you can see the share drives, right-click one, and open Properties, or if you right-click in the open space, then you can change properties for all shares at once. Also be aware that it’s possible to click on a share folder, but unless it’s highlighted, it will still bring up Properties for all shares. To confirm which Properties you are in, read the top of the window to see if it says Share Properties or HR Properties for example.

In the Security tab, if you click on Advanced, then you will get a list of all permissions entries. This shows you what objects have what permissions. You can see Administrator has Full Control and Users have Read & execute; however, Users also have Special access. Think of each of these entries as it’s own rule, so there can be multiple rules for a given group.

Something important to understand about permissions is that they can be inherited. To understand inheritance, just think about parent folders. Every folder underneath that parent folder will inherit those same permissions. Now think of a group as being a parent folder for all the users in the group. Then think about how groups can be the parent of other smaller groups. This means that with inheritance enabled, a permission set for the Users OU would apply to both of the groups we created in that OU. There are many reasons you may not want this to be enabled. It has the potential to give more permissions than necessary to groups underneath the parent. For this reason, we will disable it.
To change the inheritance settings, click on Change Permissions. This will give you the option to select disable inheritance. This will cause a pop-up asking what you want to do with the current permissions that were assigned through inheritance. In this situation, we can just convert them all to explicit permissions. Explicit permissions mean that each permission is written as a rule explicitly saying “this given object has this given permission”.


Now we can remove the permissions entries for the Users OU. Simply click on the entry to highlight it, then click Remove.
To add a new entry, click Add. In this example I’m going to create a permission entry for Help Desk. The Select a Principle option will open the windows for adding an object name. In this case it will be Help Desk.
Under Basic Permissions I’m going to add Modify, which should automatically also select Write.
Now the Help Desk account should have those permissions on all shares, but we also want to make some permissions which are specific to each share. For this you just need to repeat the same steps to get to the permission entries, but done within the Properties of an individual share folder. Repeat all steps up until you add a new entry. This new entry is going to give the HR group in Users access to the HR share folder. This group should have Modify and Write permissions added also. This can then all be repeated for the Personal share folder for the Personal group.
The first time I did this, I encountered a problem. All the steps I just showed here were not done from an account with full admin permissions over the shares. You can see in the screenshots that a few extra tabs are available once I logged back into the server VM as Administrator.

While signed in as the DOMAIN/Administrator account, I was able to get access. This is necessary because those shares are still not accessible to Confused User yet. To accomplish this, we need to go to the Sharing tab in each share’s Properties. By clicking on the Share button, you can select the Permission Level that each object has for the share folder. In this case I changed the HR share folder to allow Read/Write permissions to the HR group.

I’ll also note that Disable Inheritance is immediately available for this Administrator account, whereas with the other accounts it required an extra button to click.
Now we can test if it worked by attempting to access the share folders as Confused User from one of the client VM’s. Our goal is to allow the end user to easily and quickly access their group’s share folders; however, the shares must be mapped first before they can appear to the user in the same way a locally saved folder would.
To access the network share folders, we need to open the File Explorer on the client VM while signed on as Confused User. It is important that we know the path to the share folders because we must enter the path into the client’s File Explorer. The path can be found by looking in the Sharing tab on the server. To search for the share folder, simply type that path into the top of the File Explorer where it shows you current directory path.

To create a Quick Access mapping of the share folder to the client, click on the 3 dots to the right of View in the File Explorer tool bar. It will have an option to Pin to Quick Access, however there is a better way to map a network drive so that it doesn’t just sit as a quick access pin.
Right-click This PC, and select Map Network Drive. Then you can choose which drive letter will represent the network drive on the client. After selecting a location on the client, type in the share folder’s directory path.

Confused User should now be able to see a (Z:) drive on their computer with the name of the share folder as well as which server it is from. The default settings will make it reconnect to that same mapped location every time Confused User signs on. If you didn’t want this to happen, then do not leave Reconnect at sign-in on when mapping the drive.

Automatically Creating a Folder in a Share Drive for a User
The Personal share drive we made will be used for this purpose. Using Active Directory Users and Computers, we can configure a share drive to automatically create a folder for that user within the share drive once they access it.
This can be done from a user’s account Properties in the Profile tab. Click Connect:, then enter the path to the Personal share folder. After the path, add \%username%.
Now as soon as Confused User connects to the Personal share folder, a folder will be made inside the share called Confused User.

When the user signs out and signs back in, the automatically created folder will also automatically map itself to the drive of that user’s client.
Summary of Part 2
This section of the series contains some of the most important skills for an IT support role or help desk role. These are all very common tasks which will be performed often. It would be smart to repeat these steps until you no longer need to follow a guide to complete them. Password resets, unlocking accounts, and configuring shares are tasks that are done on a regular basis. In my opinion, these skills along with Remote Desktop and other remote services, are some of the most practical takeaways from this series. We will be covering remote services in the next part.

0 Comments